Install SentryPC
To install SentryPC simply run the installation software while logged in under an administrator account. SentryPC is very easy to use, and very easy to setup. Upon your first run of SentryPC are instructed to setup your password. If you have not done so already, please do so before continuing. You need to setup your password to allow for secure monitoring and configuration of SentryPC.
Once your password is configured you can configure each user on your computer as desired by clicking on each settings category in the Administrator Console — such as Time Management, Program Filtering, Web Filtering, etc.
Once you have configured your options you will be set to go!
Default installation path :
- c:\program files (x86)\SentryPC\ (for Windows 7 & 8)
- c:\program files\SentryPC\ (for Windows Vista, XP, NT, & 200x)
How it works
SentryPC is extremely easy to use and setup, as explained below, but a brief explanation of how it works overall is required. SentryPC is based off your Windows user accounts, rather than asking you to configure multiple accounts just for the software. For example, if your computer has 4 main users, 2 parents and 2 children, all 4 users will be able to be given their own specific monitoring, filtering, and access control settings. SentryPC will always run when the computer is loaded, and it will always run when users login to their Windows usernames automatically. The only configurations YOU have to do is simply apply filters, time schedules, and security restrictions for each user. For convenience, user settings can be copied and imported to other users.
In summary :
- SentryPC uses your built-in Windows user accounts you have created
- Each Windows username can be given their own monitoring, filtering, and access control settings
- SentryPC is always active, and will always run when the computer is booted without any configuration from you, the user
1. The main Central Command window
This window is the main interface that all users will see when they login to their Windows username. If they are not an admin they can only minimize or restore the user interface — everything else requires the admin password.

Open Admin Panel : This opens the SentryPC Admin Control Panel (explained below).
Admin Commands : This will summon a menu that lets you lock the computer, unlock it, give the user temporary full computer access, restore access to SentryPC's restricted settings, or to reset the time management counters. This menu is explained in detail under the Admin Commands help item.
Shutdown : This will close SentryPC completely. It will restart when the next user logs in under Windows, or when the computer is restarted.
Help : This displays SentryPC's help documentation.
Switch to Minimized Interface : This will minimize SentryPC into a smaller window for convenience.
Current User : The currently logged in Windows user.
Time Used this Week : This is how long the current user has used the computer this week and day (week / day format).
Time Left this Week : This is how much computer usage time the current has left this week. Once this time runs out they will be completely locked out from using their username.
2. The Admin Control Panel
This window is where all of SentryPC's configuration and setting changes take place. To start configuring a user, select them from the drop down list and click on each of the appropriate settings categories, explained below.
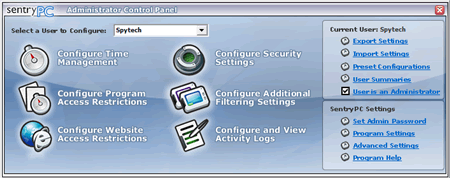
Configure Time Management : This is where you will configure time restrictions and schedules for the selected user.
Configure Program Access Restrictions : This is where you will configure what programs SentryPC will block, and what programs can run, and when.
Configure Website Restrictions : This is where you will configure what websites the user can visit.
Configure Security Settings : This is where you will enable specific security restrictions to Windows such as disabling the start menu or desktop.
Configure Additional Filtering Settings : This is where you will configure what chat clients SentryPC will block, and what keystroke phrases the user cannot type.
Configure and View Activity Logs : This is where you will configure SentryPC's activity monitoring, as well as view logged activities via its built-in log viewers.
Export/Import Settings : This feature allows you to export user configurations and then import them into other usernames, effectively allowing you to quickly copy users.
Preset Configurations : This menu quickly enables security settings for full or basic security, as well as full or internet monitoring.
User is an Administrator : Check this checkbox if you want this user to be a SentryPC admin. This means they will not have to use a password to access the Admin Control Panel, Admin Commands menu, or Shutdown. Use caution with this checkbox!
Set Admin Password : This is where you will set/change your admin password.
User Summaries : This menu allows you to prepare sleek, easy to follow reports for the users settings, overall usage, and activity monitoring.
Program Settings : These settings allow you to configure basic program settings, as well as a Startup message for all users.
Advanced Settings : This is where you can configure SentryPC's hotkey, its activity log storage location, and thread priority settings.
Setting up SentryPC's Admin Password
When you first run SentryPC you will be asked to configure your admin password, and password hint. This password is used to control access to the Admin Control Panel, Admin Commands menu, and the SentryPC Shutdown features. If you need to change or reset your password you can do so by clicking on 'Set Admin Password' within the Admin Control Panel.
Accessing SentryPC's Admin Control Panel
To access the SentryPC's Admin Control Panel just click on the 'Open Admin Panel' button on the SentryPC interface. If the user currently active within Windows is set as a SentryPC administrator then no password will needed to access this control panel, otherwise a password will be required by the user.
Configuring User Settings
Once you are in the Admin Control Panel you can configure settings for each Windows user account. First, select a user from the drop down selection list. When you select a user it will be updated in the 'Current User:' text field on the Admin Control Panel interface. Once the appropriate user is selected click on one of the six action icons such as 'Configure Time Management', 'Configure Security Settings', and so forth. You will then be able to setup the features you require for each user. Settings will automatically apply when the Admin Control Panel is closed.
To setup users quickly, click on 'Quick User Configuration' under the 'Program Help' item in the Admin Control Panel.
SentryPC Shutdown
To close SentryPC completely simply click on 'Shutdown' on the SentryPC main interface. This is password protected for all non-admins.