Installation Guide
The following instructions will ensure that SentryPC is installed and working properly on your Android device. Make sure to follow the instructions carefully and you will be up and running in no time. If you run into any problems please contact our staff with specific details and we will be glad to help you.
UPDATING : If you are updating a device to a newer version of SentryPC you will follow the same installation instructions listed below, however, you will want to uninstall the current version first so it is no longer running before you update. You can do so from the 'Licenses' page in your menu. You will not lose your current logs or settings by doing so.
Step 1 :
Download the install file from the Android device you wish to install on. You can do so at any time by visiting the 'Download' page in your online account. Your install file is linked to your account and any device it is installed will be tied to your account.
Upon visiting the download page you are presented with the option : 'Require confirmation during installation?'. This option does not apply to Android devices and can be disregarded.
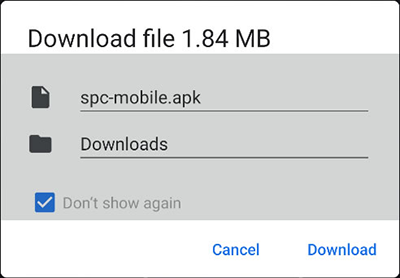
After choosing your options click the download button and save the install file on your device.
Step 2 :
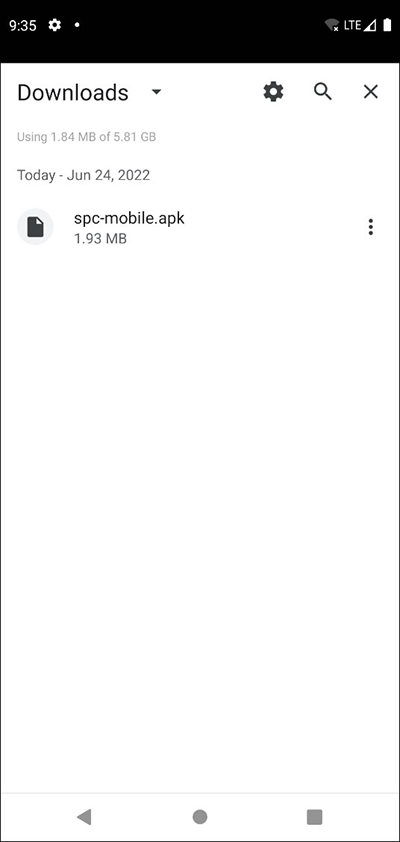
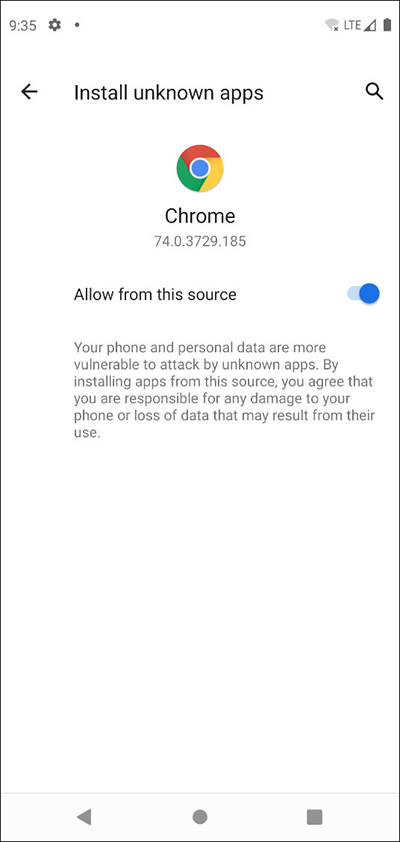
Open the Downloads folder on your device and tap on the SentryPC install file (spc-mobile.apk in this guide) to start the installation. If you are using Chrome to download and get a prompt to install unknown apps please enable the 'Allow from this source' button to continue the install.
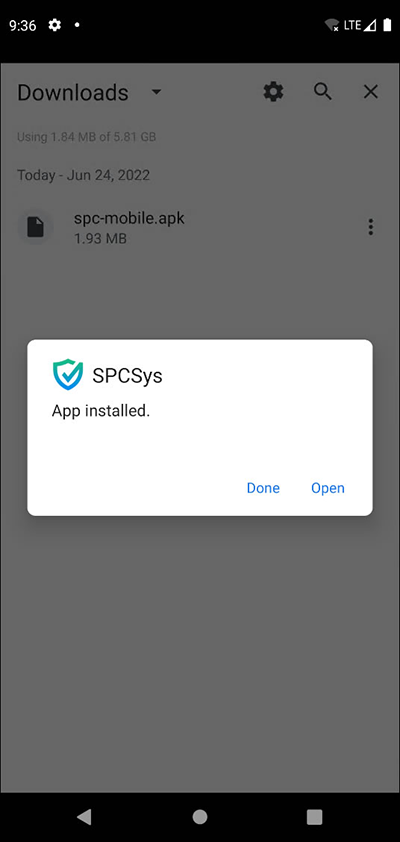
Step 3 :
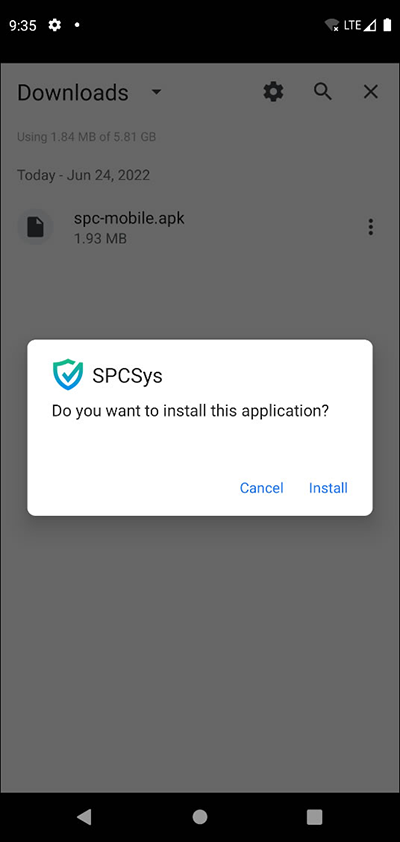
You will be prompted to install SentryPC. Click Install.
The install will only take a few moments. When the install completes click Open.
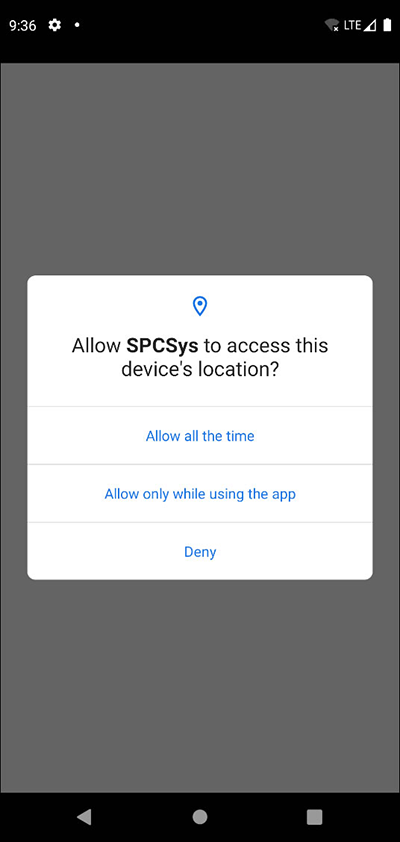
Step 4 :
You will be prompted for various permissions that SentryPC needs to track calls, texts, usage, locations, etc. Click 'Allow' for all prompts.
For 'device location' you can choose either 'Allow all the time' or 'Allow while using'. If prompted for precision choose 'Fine' for the most accurate locations.
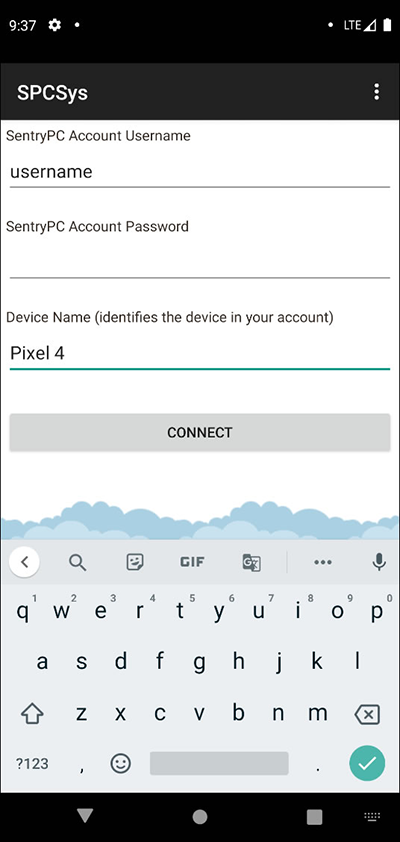
Step 5 :
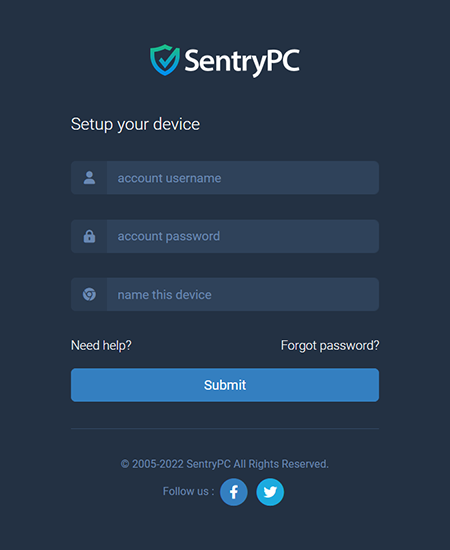
SentryPC will prompt you for your account username, account password, and a device name. The device name will be how this device displays in your SentryPC account. By default SentryPC will suggest the manufacturer name of the device. If you will be using SentryPC on multiple devices it is highly recommended you enter a unique device name for each device to easily identify them in your account. Click 'Connect' to link SentryPC to your account. At this time SentryPC will disappear and start running on the device.
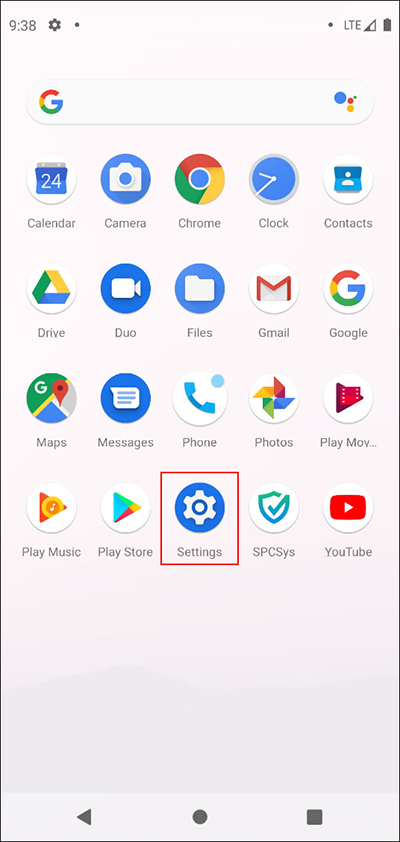
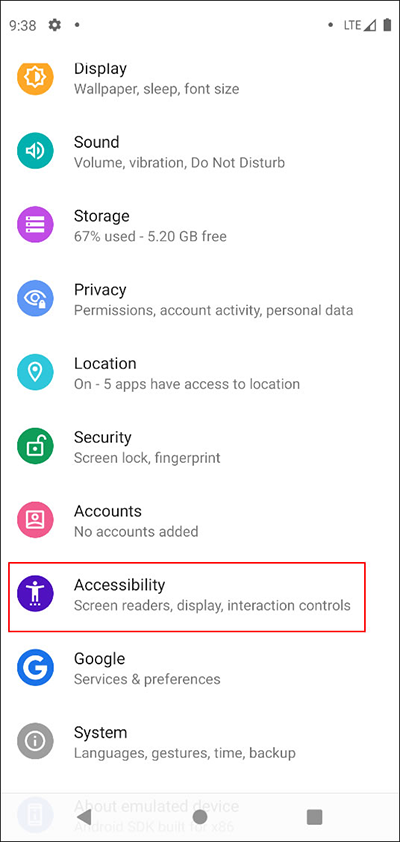
Step 6 :
Proceed to your Settings on the device. Scroll down to Accessibility.
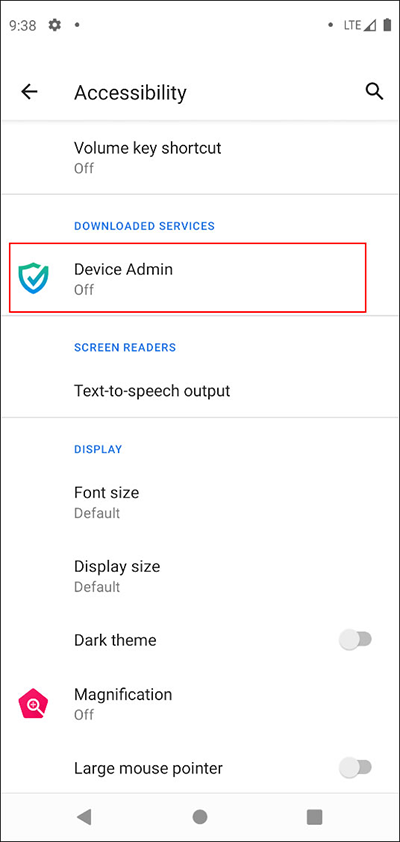
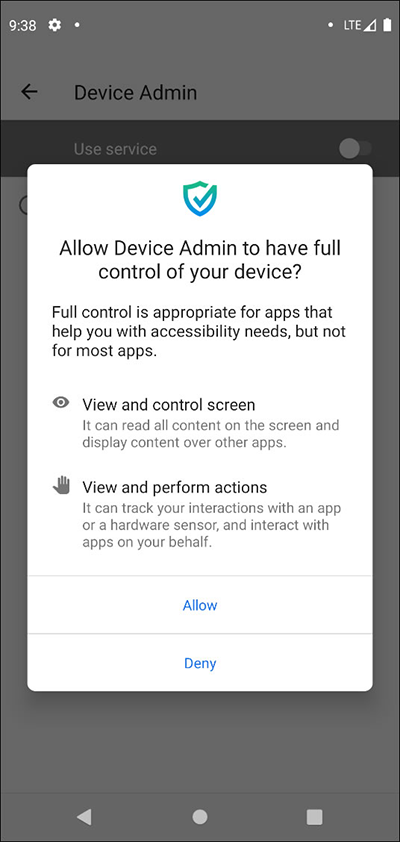
Step 7 :
Under 'Downloaded Services' click on Device Admin then enable or turn on the 'Use service' option for Device Admin. Click Allow on the Device Admin permission prompt.
Step 8 :
You have just installed SentryPC on your Android device! Now that it is installed you will see activity logs, usage, and more in your account shortly afterwards. You can now begin setting your options for the device as well in your account.
Your online account is self-explanatory for the most part, however, you can view the Help Documentation for further assistance or contact our staff if you have questions.
The following instructions will ensure that SentryPC is installed and working properly in your Chromium-based browser. Make sure to follow the instructions carefully and you will be up and running in no time. If you run into any problems please contact our staff with specific details and we will be glad to help you.
IMPORTANT : The SentryPC browser extension is downloaded from the Google Play Store. It usually takes 24-48 hours for new releases to be approved and listed by Google. When updating to a new version please check to make sure the new version is listed when visiting the store link.
Step 1 :
After clicking the download button, with Chrome selected, a popup window will display a link to SentryPC's Google Play store listing. This is where you will download/install the SentryPC extension for your Chromium-based browser.
Step 2 :
Click 'Add to Chrome' to add the SentryPC Chrome extension to your Chromium-based browser. Keep in mind the browser you use to do this is the browser SentryPC will be installed.
Step 3 :
An account information page will open in a new browser tab that will request your SentryPC account username, account password, and a name for this device. The device name entered will be used to identify this device in your SentryPC online dashboard while the username and password is what links the device to your account.
Step 4 :
Login to your account at www.sentrypconline.com to begin viewing recorded activities and to manage settings.
The following instructions will ensure that SentryPC is installed and working properly on your Macintosh device. Make sure to follow the instructions carefully and you will be up and running in no time. If you run into any problems please contact our staff with specific details and we will be glad to help you.
UPDATING : If you are updating a device to a newer version of SentryPC you will follow the same installation instructions listed below, however, you will want to uninstall the current version first so it is no longer running before you update. You can do so from the 'Licenses' page from within your online account. You will not lose your current logs or settings by doing so.
Step 1 :
Login to your Mac as the user you wish to monitor and control with SentryPC.
Download your install file. You can do so at any time by visiting the 'Download' page in your online account. Your install file is linked to your account and any device it is installed will be tied to your account.
Upon visiting the download page you are presented with the option : 'Require confirmation during installation?'. This determines whether or not confirmation is required to install SentryPC. If checked, when the install file is executed on the device a confirmation popup will show stating that SentryPC will be installed and it will ask the user to confirm the installation. If not confirmed by the user then the software is not installed. If you do not check this option then SentryPC will install without notification as soon as the file is executed on the device.
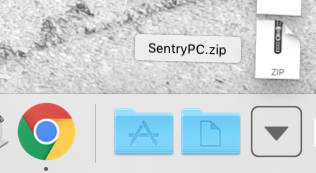
After choosing your options click the download button and save the install file on your device. The pictures below show how your downloaded file will appear in both Chrome and your Taskbar — either option can be used to access it.
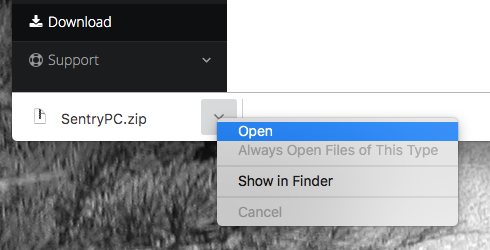
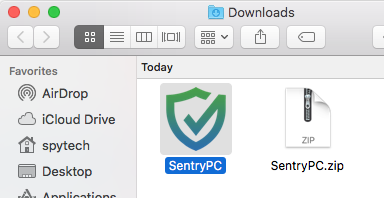
Step 2 :
Open the SentryPC.zip file you downloaded from your account. When extracted a SentryPC.app will be created (highlighted below).
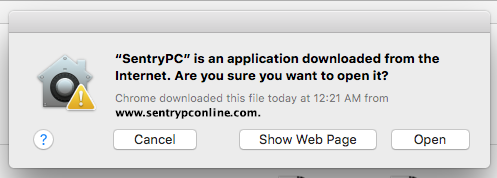
Step 3 :
Run the SentryPC application and confirm you wish to open it by clicking 'Open'. Why is my download saying it is damaged and how do I fix it?
If your install file is blocked due to an 'unidentified developer' : Click on System Preferences in your taskbar then on Security & Privacy. From your Security & Privacy settings click on the General tab. Choose 'Open Anyway' next to the message regarding the SentryPC installer you just downloaded and tried to run.
Step 4 :
If you selected the confirmation option when you downloaded the install file you will be presented with the confirmation dialog as shown below. Just click 'Yes' to confirm the installation and SentryPC will be installed. After clicking 'Yes' the software will be installed.
If you did not select the confirmation option when you downloaded the install file then you will not see the picture listed below and SentryPC will be installed, without this notice, as soon as it is executed from the previous step.

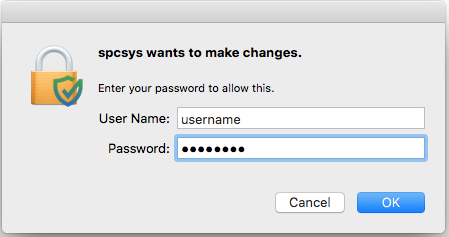
Step 5 :
You will now be presented with the following popup requiring your admin password. Enter your admin password to continue. You may need to do this twice depending on your Mac version.
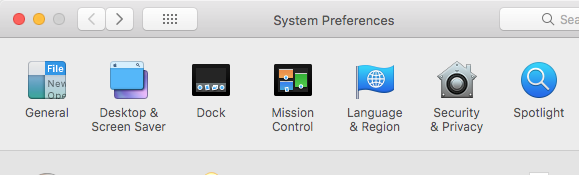
Step 6 :
Click on System Preferences in your taskbar then on Security & Privacy.
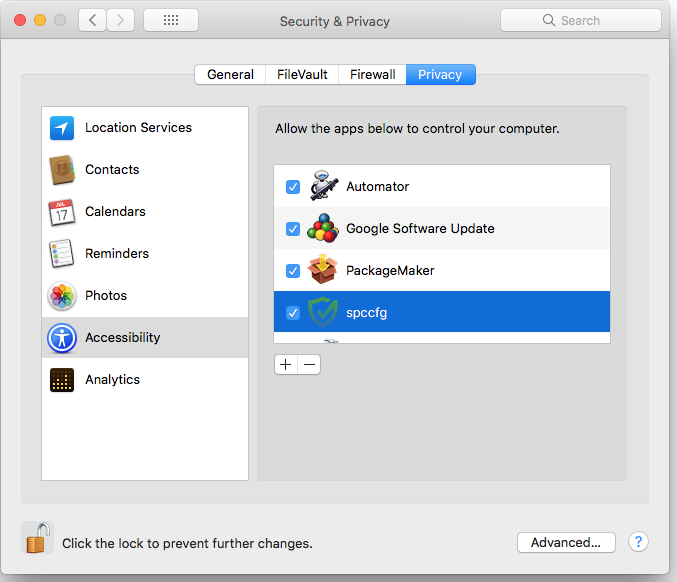
Step 7 :
You are now at your Security & Privacy settings. Click the 'Privacy' tab at the top then 'Accessibility' from the side list as shown in the image below. You want to make sure the application entry with the SentryPC icon/logo is checked/enabled. For newer operating system releases you will repeat this same process, but choosing 'Screen Recording' from the side list. You must click the lock icon in the bottom left of the screen to check/enable applications in the list. You must hover over the side list with your mouse to allow scrolling of the list.
Step 8 :
Repeat steps 1-7 for each user on the Mac you wish to monitor and record with SentryPC.
Step 9 :
You have just installed SentryPC! Since you no longer need the install file you should delete it from the device (SentryPC.zip and SentryPC.app from your 'downloads' folder if you are following this guide). You can always download it again from your account whenever you wish.
Now that it is installed you will see activity logs, active devices, active users, and more in your account shortly afterwards. You can now begin setting your options, activity filters, time management options, and more for the users of these devices.
Your online account is self-explanatory for the most part, however, you can view the 'Help Documentation' for further assistance or contact our staff if you have questions.
The following instructions will ensure that SentryPC is installed and working properly on your Windows device. Make sure to follow the instructions carefully and you will be up and running in no time. If you run into any problems please contact our staff with specific details and we will be glad to help you.
UPDATING : If you are updating a device to a newer version of SentryPC you will follow the same installation instructions listed below, however, you will want to uninstall the current version first so it is no longer running before you update. You can do so from the 'Licenses' page from within your online account. You will not lose your current logs or settings by doing so.
Step 1 :
Before downloading your install file you will want to temporarily disable any antivirus scanners you have on your system. Some antivirus scanners may prevent the download if not disabled beforehand or cause issues with the rest of the installation process. This is not because SentryPC is harmful, but because antivirus scanners interpret its monitoring and control abilities as so. Without the installation file downloaded properly you cannot continue with installation. Why is my download being blocked and/or my antivirus scanner is reporting it?
Step 2 :
Now you can go ahead and download your install file. You can do so at any time by visiting the 'Download' page in your online account. Your install file is linked to your account and any device it is installed will be tied to your account.
Upon visiting the download page you are presented with the option : 'Require confirmation during installation?'. This determines whether or not confirmation is required to install SentryPC. If checked, when the install file is executed on the device a confirmation popup will show stating that SentryPC will be installed and it will ask the user to confirm the installation. If not confirmed by the user then the software is not installed. If you do not check this option then SentryPC will install without notification as soon as the file is executed on the device.
After choosing your options click the download button and save the install file on your device. It is important to remember where you save your installation file.
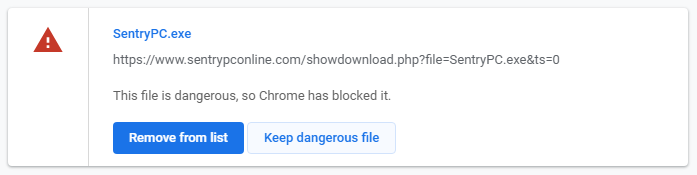
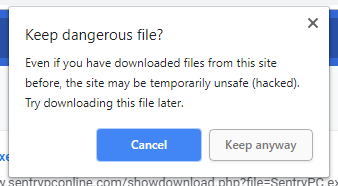
CHROME USERS : If you are using Google Chrome and it blocks your download please press CONTROL + J in Chrome to open its Download Manager. You can then use the appropriate buttons to keep the file. Chrome is trying to block software, such as SentryPC, that has monitoring and control abilities.

Step 3 :
It is time to install. You will use the install file you downloaded in the previous steps to do this. The first picture below shows an example of the install file saved to the device's desktop.
If you are installing to a device different than which you downloaded the install file you will need to copy, transfer, email, etc the install file to the device you wish to install SentryPC. You can do this any way you wish. The install file is no different than any other file and the only requirement is it be executed 'on' the device you wish to install it. For the same reason as stated in Step 1 above, you will need to disable any anti-virus scanners on the device(s) you will be transferring the install file to or which you will be installing SentryPC.
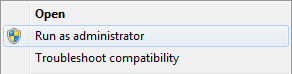
Once you have the file available to the device you want to install you want to right click it with your mouse to bring up the option menu. From this option menu select 'Run as administrator' as shown in the second image below. This will execute the install file with administrator privileges. This simply ensures the software is installed with the correct permissions needed for a successful installation.
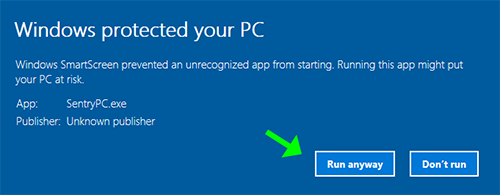
Step 4 :
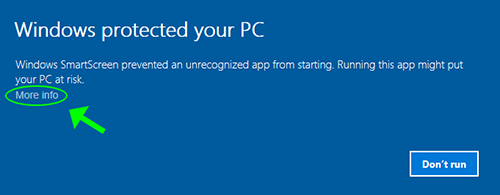
Now that the file has been executed you 'may' be shown a Windows Smart Screen warning similar to the image below depending on what version of Windows the device has. If so, you will want to click on 'More info' as circled in the first image. Upon doing this a new set of buttons will be shown. Click the 'Run anyway' button as shown in the second image to continue.
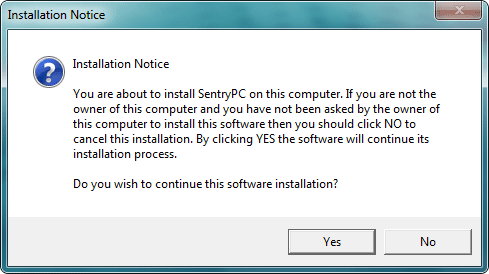
Step 5 :
If you selected the notification option when you downloaded the install file you will be presented with the confirmation dialog as shown below. Just click 'Yes' to confirm the installation and SentryPC will be installed. After clicking 'Yes' the software will be installed — there is nothing else you need to do nor are there any other notifications shown to you on the screen.
If you did not select the confirmation option when you downloaded the install file then you will not see the picture listed below and SentryPC will be installed, without this notice, as soon as it is executed from the previous step. There is nothing else you need to do nor are there any notifications shown to you on the screen.
Step 6 :
Now that SentryPC is installed on the device you will want to exclude SentryPC's files from any antivirus scanners on the device(s). It is important to note that this must be done for every scanner you have on your system as some people have multiple installed on their device. Why must I exclude SentryPC from my antivirus scanners?
All popular antivirus scanners have an exclusion list which you can modify in the scanner's settings. What this does is allow you to 'exclude' specific files or folders from being scanned by your scanner. To prevent tampering of SentryPC's files and ensure it operates properly you must exclude its files from your antivirus scanners.
Configure your antivirus scanners : View our Antivirus Instructions page for details on setting up your antivirus scanners correctly.
Step 7 :
You have just installed SentryPC! Since you no longer need the install file you should delete it from the device (SentryPC.exe). You can always download it again from your account whenever you wish. At this time you may also enable your antivirus scanners again since you have excluded SentryPC's files in the previous step.
Now that it is installed you will see activity logs, active devices, active users, and more in your account shortly afterwards. You can now begin setting your options, activity filters, time management options and more for the users of these devices. Login to your online account to do so.
Your online account is self-explanatory for the most part, however, you can view the 'Help Documentation' for further assistance or contact our staff if you have questions.